


Zabbix 2.0.6 on CentOS 6.4 using source
This article is a modified version of a good article install Zabbix 1.8
Download and extract Zabbix
wget http://sourceforge.net/projects/zabbix/files/ZABBIX%20Latest%20Stable/2.0.6/zabbix-2.0.6.tar.gz/download
tar -zxvf zabbix-2.0.6.tar.gz
cd zabbix-2.0.6
Setting up the user accounts
The Zabbix server and client both need a user account that they can run on, so may as well set this up first. This also needs to be done on every monitored machine that is running the Zabbix agent:
groupadd -g 130 zabbix
useradd -u 130 -g zabbix -c 'Zabbix monitoring' zabbix
I have added the ”-u 130” parameter – this ensures that the zabbix user gets created with the same user ID on every server that we created it on, as well as with the zabbix group (which will be group id 130).
Dependencies
First install all the dependencies with yum using the command
yum install zlib-devel mysql-devel glibc-devel curl-devel gcc automake mysql libidn-devel openssl-devel net-snmp-devel rpm-devel OpenIPMI-devel
Configure the EPEL repository from
You need to go to EPEL and download relevant rpm for your centos, for my case i downloaded and installed for EL6 as I am using centOS 6.4
su -c 'rpm -Uvh http://download.fedoraproject.org/pub/epel/6/i386/epel-release-6-8.noarch.rpm'
yum --enablerepo=epel install iksemel iksemel-devel
Install Zabbix 2.0.6
Navigate to directory where you have extracted zabbix, and use following to configure
./configure --enable-server --with-mysql --with-net-snmp --with-jabber --with-libcurl --with-openipmi --enable-agent
You should be able to see something like this
Enable server:         yes
With database:         MySQL
WEB Monitoring via:    cURL
Native Jabber:         yes
SNMP:                  net-snmp
IPMI:                  openipmi
Enable agent:          yes
if Everything is fine then make and install.
make
make install
You are done with installation,
Creating the MySQL DB
If you have MySql pre installed and you have set the root user and password you just need to login and create database, you just skip next step
start Mysql
service mysqld start
if you are starting your MySql first time you need to set the root password.
mysqladmin -u root password 'new-password-here'
Login to Mysql and create Database and user
mysql -u root -p
create database zabbix character set utf8;
grant all privileges on zabbix.* to 'zabbix'@'localhost' identified by 'set-password-here';
quit;
Create Database Schema.
Mysql scripts are located in database directory in your source, please make sure to execute mysql script in this order.
cd database/mysql/ mysql -uzabbix zabbix < schema.sql -p mysql -uzabbix zabbix < images.sql -p mysql -uzabbix zabbix < data.sql -p [/code] Once we are done with installation and Mysql, it is time to configure the Zabbix and run it. <strong>Configure Zabbix</strong> zabbix 2.0.6 installation will place its conf file at following location (atleast for me :) ) [code] /usr/local/etc/zabbix_server.conf
we need to edit this file and add Database details in. we need to locate followings in the conf file
DBName=
DBUser=
DBPassword=
edit the zabbix_server.conf
nano /usr/local/etc/zabbix_server.conf
DBName=zabbix
DBUser=zabbix
DBPassword=your-zabbix-mysql-password
Permissions and Running Zabbix Server
It is recommended to change the file permissions for the Zabbix config so not every user can just read the password out of our file
chmod 400 /etc/zabbix/zabbix_server.conf
chown zabbix /etc/zabbix/zabbix_server.conf
Now we can execute the script zabbix_agentd and zabbix_server which are found in /usr/local/sbin/
/usr/local/sbin/zabbix_agentd
/usr/local/sbin/zabbix_server
if all went well you shouldn’t get any error messages.
just to make sure that zabbix is running try this
ps -e | grep zabbix
Creating startup scripts
i have noticed that zabbix 2.0.6 do not contain start-up script for centos so i copied from zabbix 1.8 and a small modification made it run on centos6.4 here is the start-up script
#!/bin/bash
#
# chkconfig: - 55 45
# description: zabbix_server
# probe: false

# Source function library.
. /etc/rc.d/init.d/functions

# Source networking configuration.
. /etc/sysconfig/network

# Check that networking is up. If you are running without a network, comment this out.
[ "${NETWORKING}" = "no" ] && exit 0

RETVAL=0
progdir="/usr/local/sbin/"
prog="zabbix_server"

start() {
        # Start daemons.
  if [ -n "`/sbin/pidof $prog`" ]; then
        echo -n "$prog: already running"
        failure $"$prog start"
        echo
        return 1
  fi
        echo -n $"Starting $prog: "
  # we can't seem to use daemon here - emulate its functionality
        su -c $progdir$prog - $USER
  RETVAL=$?
  usleep 100000
  if [ -z "`/sbin/pidof $progdir$prog`" ]; then
        RETVAL=1
  fi
  [ $RETVAL -ne 0 ] && failure $"$prog startup"
  [ $RETVAL -eq 0 ] && touch /var/lock/subsys/$prog && success $"$prog startup"
  echo
  return $RETVAL
}
stop() {
  RETVAL=0
  pid=
        # Stop daemons.
        echo -n $"Stopping $prog: "
  pid=`/sbin/pidof -s $prog`
  if [ -n "$pid" ]; then
   kill -TERM $pid
        else
   failure $"$prog stop"
   echo
   return 1
        fi
  RETVAL=$?
  [ $RETVAL -ne 0 ] && failure $"$prog stop"
  [ $RETVAL -eq 0 ] && rm -f /var/lock/subsys/$prog && success $"$prog stop"
  echo
  return $RETVAL
}
restart() {
  stop
sleep 5
  start
}

# See how we were called.
case "$1" in
  start)
        start
        ;;
  stop)
        stop
        ;;
  restart)
        restart
        ;;
  condrestart)
        [ -f /var/lock/subsys/$prog ] && restart
        ;;
  *)
         echo $"Usage: $0 {start|stop|restart|condrestart}"
        exit 1
esac

exit $?
copy the above script
nano /etc/init.d/zabbix_server
paste above copied content and save it.
You also need to create zabbix Agent Startup script
#!/bin/bash
#
# chkconfig: - 55 45
# description: zabbix_agentd
# probe: false

# Source function library.
. /etc/rc.d/init.d/functions

# Source networking configuration.
. /etc/sysconfig/network

# Check that networking is up. If you are running without a network, comment this out.
[ "${NETWORKING}" = "no" ] && exit 0

RETVAL=0
progdir="/usr/local/sbin/"
prog="zabbix_agentd"

start() {
        # Start daemons.
  if [ -n "`/sbin/pidof $prog`" ]; then
        echo -n "$prog: already running"
        failure $"$prog start"
        echo
        return 1
  fi
        echo -n $"Starting $prog: "
  # we can't seem to use daemon here - emulate its functionality
        su -c $progdir$prog - $USER
  RETVAL=$?
  usleep 100000
  if [ -z "`/sbin/pidof $progdir$prog`" ]; then
        # The child processes have died after fork()ing, e.g.
        # because of a broken config file
        RETVAL=1
  fi
  [ $RETVAL -ne 0 ] && failure $"$prog startup"
  [ $RETVAL -eq 0 ] && touch /var/lock/subsys/$prog && success $"$prog startup"
  echo
  return $RETVAL
}
stop() {
  RETVAL=0
  pid=
        # Stop daemons.
        echo -n $"Stopping $prog: "
  pid=`/sbin/pidof -s $prog`
  if [ -n "$pid" ]; then
   kill -TERM $pid
        else
   failure $"$prog stop"
   echo
   return 1
        fi
  RETVAL=$?
  [ $RETVAL -ne 0 ] && failure $"$prog stop"
  [ $RETVAL -eq 0 ] && rm -f /var/lock/subsys/$prog && success $"$prog stop"
  echo
  return $RETVAL
}
restart() {
  stop
# wait for forked daemons to die
  usleep 1000000
  start
}

# See how we were called.
case "$1" in
  start)
        start
        ;;
  stop)
        stop
        ;;
  restart)
        restart
        ;;
  condrestart)
        [ -f /var/lock/subsys/$prog ] && restart
        ;;
  *)
         echo $"Usage: $0 {start|stop|restart|condrestart}"
        exit 1
esac

exit $?
Copy the above agent start-up script and edit
nano /etc/init.d/zabbix_agentd
paste the copied text in and save,
**Please note**: In above scripts you might need to change the “progdir”. progdir is the physical path of zabbix server binary. you can use whereis to locate it
whereis zabbix_server
/usr/local/sbin/zabbix_server
Now let us add it to the services with
chkconfig --add zabbix_server
chkconfig --add zabbix_agentd
all that is left, it to tell the system on which runlevels it should start them, we are going to use runlevel 3 and 5.
chkconfig --level 35 zabbix_server on
chkconfig --level 35 zabbix_agentd on
to verify that the changes have been made, we can use chkconfig to list all configurations with
chkconfig --list
or to just show the zabbix services we can customize our output with grep
chkconfig --list | grep zabbix
All that is left to be done, is to make these scripts executable, this is done with the following command
chmod 755 /etc/init.d/zabbix_server
chmod 755 /etc/init.d/zabbix_agentd
Now we can control our scripts with
service zabbix_server {start|stop|restart|condrestart}
Installing the Web frontend
yum install php-mysql php-gd php-bcmath php-mbstring php-xml
batter to add mysql and httpd to startup
/sbin/chkconfig --add httpd
/sbin/chkconfig httpd on
/sbin/chkconfig --add mysqld
/sbin/chkconfig mysqld on
copy the frontend to your httpd root
cp -r frontends/php/ /var/www/html/
mv /var/www/html/php/ /var/www/html/zabbix
access the zabbix frontend
http://[SERVER-IP]/zabbix
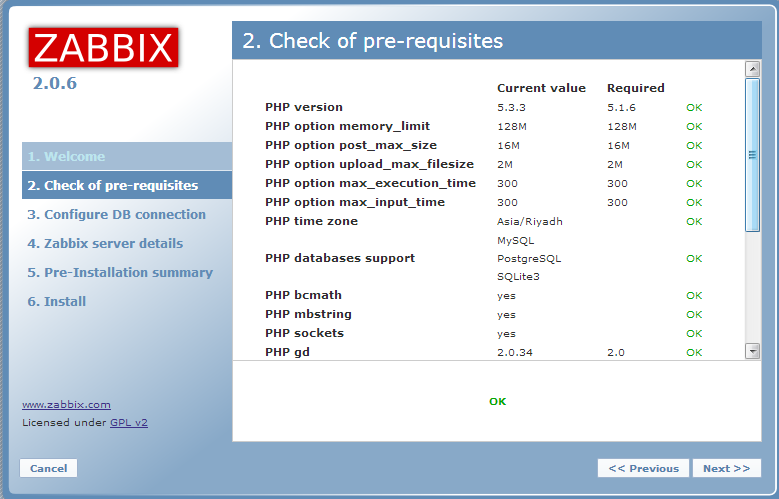
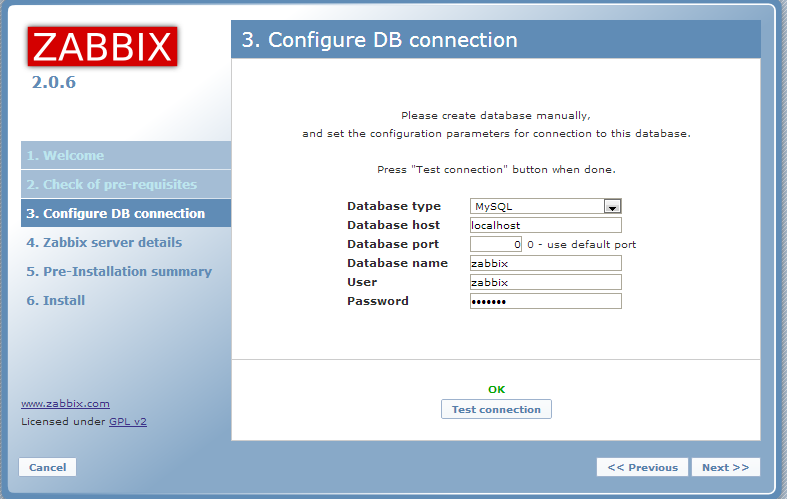
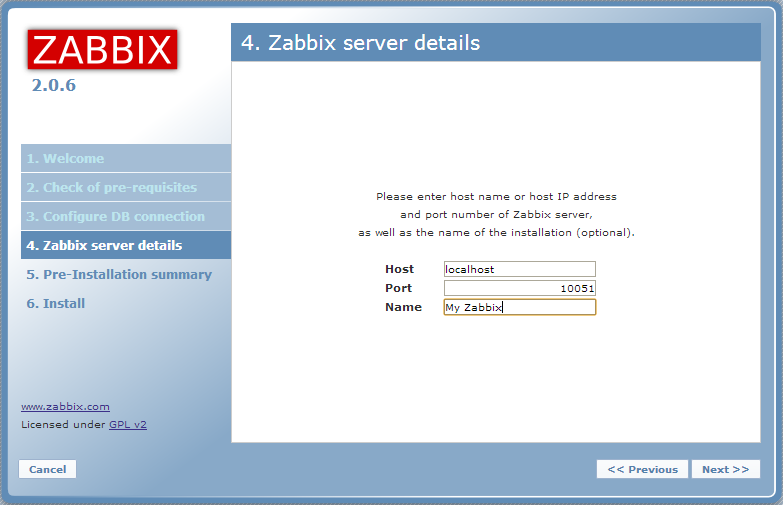
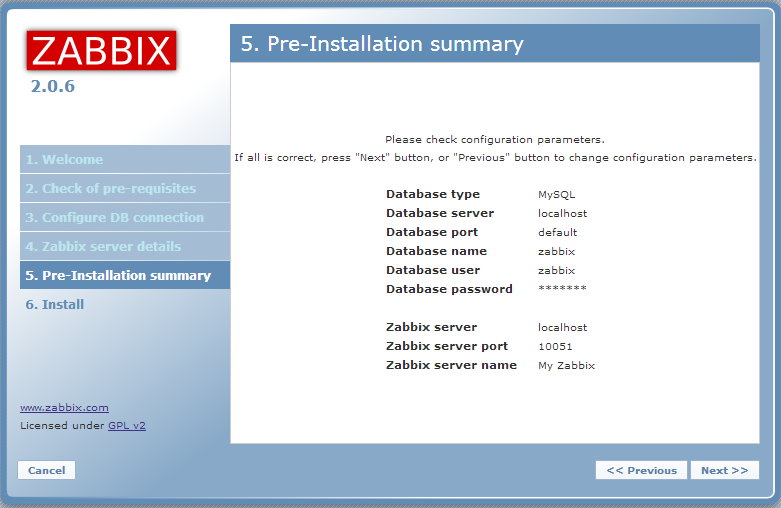
you will see the a wizard and follow that.

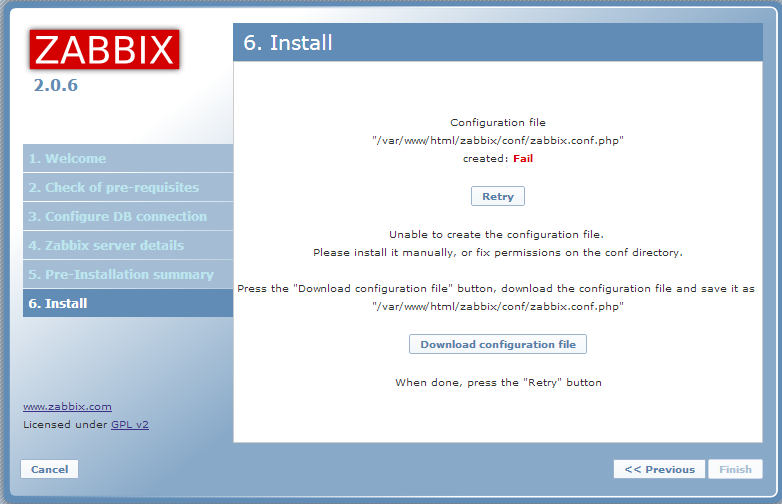
Please Note you will face this error, this write fail for zabbix conf.
do this
cd /var/www/html/zabbix/
chmod 777 conf
then press retry and you will see this screen.

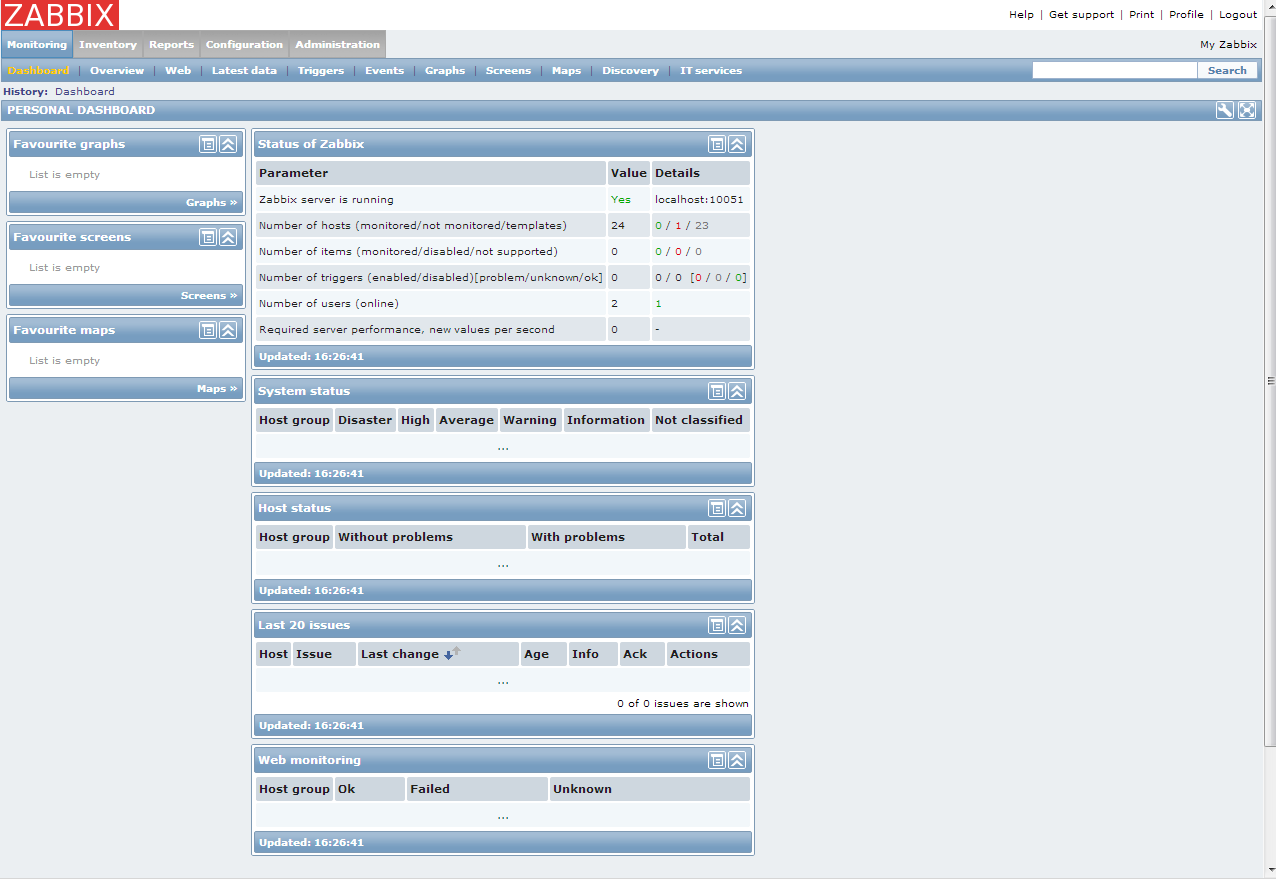
You are done.
i have the problem. if i add new host and show sms “Get value from agent failed: cannot connect to [[xx.xx.xx.xx]:10050]: [4] Interrupted system call” can you help me. if you need please sent back to my email. and i will sent picture to you.
thank you.
br.
Tom
i think you need to disable SELINUX,
please try 2 things
1) flush current iptables
iprables -F
and also you need to follow this to disable SELINUX,
http://www.akashif.co.uk/php/curl-error-7-failed-to-connect-to-permission-denied
above blog is written for different purpose, but the process is same to disable SELINUX.
try that. i suspect this will solve your issue
Hi,
I’m stuck here Create Database Schema. How o execute mysql script Any help ?
Hoping that you have root access to your centOS box,
login to mysql and create database and a database user which will be used by zabbix.
1) login
mysql -u root -p
2) once you are in mysql use following query to create database
create database zabbix character set utf8;
3) create user and give access to above created database.
grant all privileges on zabbix.* to ‘zabbix’@’localhost’ identified by ‘set-password-here’;
4) logout from mysql
quit;
Hoping that you have already installed “zabbix”
zabbix ships default mysql scripts with it.
you can use following commands to find where are files.
1) login as root
2) updatedb
3) locate schema.sql
you need to use mysql command to import the import the sql files.
mysql -uUSER_NAME DATABASE_NAME < IMPORT_FILE_NAME -p it will ask for your mysql user password (which you have already created as i mentioned above in this comment) files should be imported in this order mysql -uzabbix zabbix < schema.sql -p mysql -uzabbix zabbix < images.sql -p mysql -uzabbix zabbix < data.sql -p if you still face issue, please share your error. Thanks Ali
Thanks very much this explanation helped me a lot. I’ll continue with the installation . Much appreciated
Cesar
Hi, I followed carefully the steps , No error so far but I Cant access the zabbix frontend. Thanks in advance for your patience and support